Setting up a printer correctly is essential for smooth operation and long-term performance. Whether using a wired or wireless printer, following the right setup steps ensures seamless printing. By downloading the correct drivers, ensuring proper connectivity, and troubleshooting issues, users can maximize their printer’s potential. Printers are valuable tools, but they need proper care and setup for the best results. With this guide, you can confidently set up and use your printer without unnecessary frustration.
When a printer is set up correctly, users can enjoy:
✅ Seamless printing – No connection or compatibility issues.
✅ Better print quality – Crisp text and vibrant images.
✅ Increased efficiency – Wireless and mobile printing options.
✅ Reduced maintenance – Fewer paper jams and ink issues.
A well-configured printer enhances productivity at home or in the workplace.
How to Set Up a Printer (Step-by-Step Guide)
Step 1: Unbox and Prepare the Printer
Carefully remove the printer from the box and take off all protective materials, including tapes and plastic covers.
Place the printer on a flat surface near a power source and your computer or router (for wireless printers).
Step 2: Connect the Power and Turn It On
Plug the printer into a power outlet using the provided power cable.
Press the Power button to turn on the printer.
Wait for the printer to initialize.
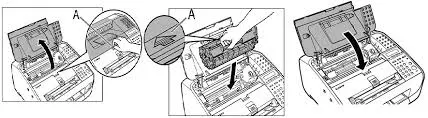
Step 3: Install Ink or Toner Cartridges
Open the ink/toner access panel (refer to the user manual if needed).
Unwrap the ink or toner cartridges and insert them into the respective slots.
Close the access panel and allow the printer to recognize the cartridges.
Step 4: Load Paper into the Tray
Adjust the paper tray and guides to fit the size of the paper.
Place the paper neatly into the tray without overloading it.
Slide the tray back into the printer.
Step 5: Connect the Printer to Your Computer or Network
You can connect the printer via USB cable, Wi-Fi, or Bluetooth, depending on your model.
For a USB Connection
Plug one end of the USB cable into the printer and the other into your computer.
The computer should automatically detect the printer.
For a Wi-Fi Connection
Go to the printer’s Settings >Wireless Settings.
Select your Wi-Fi network and enter the password.
Wait for the printer to connect to the network.
For a Bluetooth Connection (if supported)
Enable Bluetooth on both the printer and your device.
Search for the printer in your Bluetooth settings and pair it.
Step 6: Install Printer Drivers & Software
Visit the website.
Enter your printer model and download the latest driver.
Install the driver by following on-screen instructions.
Restart your computer if necessary.
Step 7: Test the Printer
Print a test page from the printer’s control panel or from your computer.
Check if the print quality and alignment are correct.
Your printer is now set up and ready to use!
How to Download Printer Drivers (Step-by-Step Guide)
Downloading and installing the correct printer drivers ensures your printer works smoothly with your computer. Follow these steps to download and install printer drivers correctly.
Step 1: Identify Your Printer Model
Look for the model number on the front, back, or bottom of the printer.
Note the exact model name.
Step 2: Visit the Website
Open a web browser (Chrome, Edge, Firefox, etc.).
Go to the website.
Step 3: Search for Your Printer Model
Find the Search section on the website.
Type your printer’s model number in the search bar.
Select your printer from the search results.
Step 4: Choose Your Operating System
The website will detect your OS automatically (Windows, macOS, ).
If not detected, manually select your OS version (Windows, macOS Ventura, etc.).
Step 5: Download the Driver
Look for the latest Full Driver or Basic Driver option.
Full Driver includes additional features for scanning, maintenance, and troubleshooting.
Basic Driver only includes essential drivers for printing.
Click Download and wait for the file to be saved to your computer.
Step 6: Install the Printer Driver
Locate the downloaded file (usually in the Downloads folder).
Double-click the file to start the installation.
Follow the on-screen instructions:
Accept the license agreement.
Choose USB or Wireless Connection (depending on your setup).
Follow prompts to complete the installation.
Restart your computer if required.
Step 7: Verify Printer Installation
Open Control Panel > Devices and Printers (Windows) or System Preferences > Printers & Scanners (Mac).
Check if your printer is listed and set as default.
Print a test page to confirm the setup.
Your printer drivers are now installed! If you face issues, try updating drivers or reinstalling them.
Common Printer Setup Issues and Fixes
Even with a correct setup, some users may face issues. Here are common problems and their solutions:
1. Printer Not Detected by the Computer
Ensure the printer is powered on.
Check USB or Wi-Fi connections.
Update or reinstall printer drivers.
2. Printer Showing Offline Status
Restart the printer and computer.
Set the printer as default in settings.
Run the Windows Printer Troubleshooter.
3. Print Quality Issues
Clean the printhead or nozzle.
Use high-quality paper.
Replace low ink or toner cartridges.
4. Slow Printing Speed
Reduce print resolution for faster output.
Use a wired connection for faster data transfer.